标签归档:ipv6

分享openwrt另一种ipv6的配置

https://www.right.com.cn/forum/thread-4090898-1-1.html

插个图修正一下
============================================================================================================

假设 IPV6-PD 为 /60 的前缀 240e:3c1:5665:ddXY::/60 。就是意味着:

X 这个 60 位是 ISP 分配给你的,也是固定的,Y 这个位才是子网的位数,而 IPV6 都是 16 进制,各位大佬都知道就是 0-F 这样,也就是说后 64 位 SLAAC 方式能分出 16 个子网 /64 的。

240e:3c1:5665:dd70::/60 这个前缀可以分成

2 个 /61 子网:

240e:3c1:5665:dd70::/61
240e:3c1:5665:dd78::/61

4 个 /62 子网

240e:3c1:5665:dd70::/62
240e:3c1:5665:dd74::/62
240e:3c1:5665:dd78::/62
240e:3c1:5665:dd7c::/62

8 个 /63 子网

240e:3c1:5665:dd70::/63
240e:3c1:5665:dd72::/63
240e:3c1:5665:dd74::/63
240e:3c1:5665:dd76::/63
240e:3c1:5665:dd78::/63
240e:3c1:5665:dd7a::/63
240e:3c1:5665:dd7c::/63
240e:3c1:5665:dd7e::/63

16 个 /64 子网

240e:3c1:5665:dd70::/64~240e:3c1:5665:dd7F::/64

这个理解了的话。

============================================================================================================

下面开始说路由了:

先说非级联(只有一级路由),非级联就是多口 LAN ( VLAN )分子网

一级路由

WAN 获取 IPV6-PD 240e:3c1:5665:dd70::/60
LAN1,LAN1 可以 以 240e:3c1:5665:dd70::/60 下发,只有一个大子网。

和上面划分子网方式一样,可以分 LAN1-LAN16 。每个不同的 LAN 口分配 240e:3c1:5665:dd70::/64~240e:3c1:5665:dd7F::/64 的不同子网。来区分不同的使用情况,比如 LAN1 对应于家里的物联设备。LAN2 是普通上网设备云云。

但大多数路由,默认情况下,不会直接使用 /60 这么大的一个子网,为了方便使用和节省运力,还有所谓的兼容性,反正只有一级,所以默认下是从 /60 里随意抽了一个 /64 的子网,一般是抽 0,也就是 240e:3c1:5665:dd70::/64 开始分配 LAN1 下的设备。

LAN1 设备获取的 ip 地址均为 240e:3c1:5665:dd70:开头,也是大多家用的路由的默认下对IPV6-PD的配置。

============================================================================================================

级联,IPV6-PD 就要算算子网问题了

一级路由

WAN 获取 240e:3c1:5665:dd70::/60 前缀。

LAN 以 240e:3c1:5665:dd70::/60 下发
LAN 的 IPV6 地址 240e:3c1:5665:dd70::1 (假设设定为::1)

二级路由

WAN 获取的 IPv6 地址永远都是 /64 的,240e:3c1:5665:dd70:1111:2222:3333:4444/64
WAN 获得了一个  IPV6-PD 前缀:240e:3c1:5665:dd78::/61

LAN 以 240e:3c1:5665:dd78::/61 下发
LAN 的 IPV6 地址为 240e:3c1:5665:dd78::1

这样二级路由下发PD就只有剩下的一半子网了。
因为 240e:3c1:5665:dd70::/61 这段,一级路由的 LAN 段抽了 240e:3c1:5665:dd70::/64 用了啊。
虽然 240e:3c1:5665:dd71::/64~240e:3c1:5665:dd77::/64 这段并没有使用。

当然一级路由也可以 分子网一样,用了 LAN2~LAN8 (均以 /64 分配)

三级路由( WAN 接二级 LAN )

WAN 获取的 IPv6/64,240e:3c1:5665:dd78:aaaa:bbbb:cccc:dddd/64
WAN 获得前缀:240e:3c1:5665:dd7c::/62

LAN 下发 240e:3c1:5665:dd7c::/62
LAN 的 IPV6 地址为 240e:3c1:5665:dd7c::1

四级路由( WAN 接二级 LAN )同理

WAN 获取的 IPv6/64,240e:3c1:5665:dd7c:aaaa:1111:cccc:2222/64
WAN 获得前缀:240e:3c1:5665:dd7e::/63

LAN 下发 240e:3c1:5665:dd7e::/63
LAN 的 IPV6 地址为 240e:3c1:5665:dd7e::1

五级路由( WAN 接二级 LAN )同理

WAN 获取的 IPv6/64,240e:3c1:5665:dd7e:aaaa:3333:cccc:4444/64
WAN 获得前缀:240e:3c1:5665:dd7f::/64

LAN 下发 240e:3c1:5665:dd7f::/64
LAN 的 IPV6 地址为 240e:3c1:5665:dd7f::1

好了,到了这里就是 /64 了,如果还接一个路由,如果还是以 SLAAC 方式
就只能用 NAT6,一类本地地址了。当然这里用 WAN 接 LAN,去掉 ipv4 协议的穿透方式让六级路由获取五级同级的 ipv6 子网段也是可以的。

当然,可以继续用statful模式,占用主机位继续下发。能一直到 /128位。(注:目前全球公网地址前缀,在op中不能申请小于/64的前缀)

另外:特殊情况是,从一个/60的大子网中抽取了一个/64的 0,假如没有其他子网使用后面的/64段位,实际上可以 级联16个子网。(跨子网段并没有测试,有兴趣可以自己尝试,图在最后。)

简单说,看下面图示了。

============================================================================================================

然后变种一下。假如一级路由。分了 4 个 VLAN,一开始就分了 /62 4 个子网。按上面的说法,就是最多挂 3 级路由就 over 了。

当然对于家用,已经 100%够用了。

============================================================================================================

所以说白了,不是说给的 ip 地址不够多,是多,说人话就是说,你一个 /64 的子网能接入 NNNN 多个设备,毕竟 SLAAC 都好,后面 64 位的主机位能让你的 IP 地址数量数不完,只是子网这个货色,一般是用来区分网络分区作用多些。

就好比非子网,不同网段 192.168.1.0~192.168.254.0,你都能设置 1~254 这样的区域,如 192.168.1.0 和 192.168.2.0 这样的不同网段LAN。

而 IPV6 中除了一开始从一级路由平层分开或者级联 /60 前缀为 /64 的 16 个子网外,用 ip6tabel 禁止每个子网相互通信外,或者 vlan 隔离,级联中就得考虑只有这 16 个子网的 1 、2 、4 、8 、16 的分配法而已。

============================================================================================================

然后关于PD下发的LAN设置和PD的获取。

WAN口要获得PD前缀

一级路由PPPoE是try

二级路由在WAN6口,为DHCPv6中设置请求指定长度的ipv6前缀,也可以写上想要请求的位数(上文能理解的话),获得ipv6地址可以disable。

一级路由的LAN的配置中,如果不需要继续下发PD,DHCP中ipv6设置,只需要第一项,路由通告服务:服务器模式,即可。LAN下所有设备都会获得WAN的PD的IPV6地址。

如果需要把PD下发到二级路由,第二项才需要设置,DHCPv6:服务器模式。这个才是把IPV6-PD下发到二级路由。

第三个配置。NDP这个是网络邻居发现,关闭也不影响。

============================================================================================================

举例就是

假如你有一个一级路由,给你240e:3c1:5665:dd70::/60 前缀,你有三个LAN,其中一个LAN口接了个二级路由。


那 LAN1 【常规】配置页面,指定长度的ipv6前缀:/61,ipv6分配提示:0;在LAN1的【DHCP服务器-IPV6设置】中配置:路由通告服务:服务器模式,DHCPv6:服务器模式,DHCPv6 模式:无状态。LAN1可以继续接二级路由。

LAN1 的 /61 用去了 0-7,但LAN1这个LAN段本身要用去一个子网,所以二级路由的PD前缀,最多也只能是240e:3c1:5665:dd74::/62了(240e:3c1:5665:dd70::/62段用去了LAN1下设备了。),当然默认情况,路由还是从240e:3c1:5665:dd74::/62中选 240e:3c1:5665:dd74::/64子网段的。如果不去设置它,那也就无法继续接三级路由了。
LAN2 【常规】配置页面,指定长度的ipv6前缀:/64,ipv6分配提示:8;在LAN1的【DHCP服务器-IPV6设置】中配置:路由通告服务:服务器模式,DHCPv6:已禁用,DHCPv6 模式:无状态。LAN2不接二级路由。

LAN3 【常规】配置页面,指定长度的ipv6前缀:/64,ipv6分配提示:e;在LAN1的【DHCP服务器-IPV6设置】中配置:路由通告服务:服务器模式,DHCPv6:已禁用,DHCPv6 模式:无状态。LAN2不接二级路由。

当然ipv6分配提示不填也行,如果自己想有些主动权,想用不同的0-f标识不同的LAN,就可以根据子网的计算来自行设定。另外,LAN1+LAN2+LAN3子网数 不超过 /60 就行。就是LAN1 /61 +  LAN2 /62+ LAN3 /62

============================================================================================================

实际要是有 /56 。个人的可选择的空间就多了。/60 只有区区16个子网数,IP地址数是上亿,子网只有16个而已。

毕竟如果 一开始分了 /62 四个子网 LAN ,继续接二级路由,可用子网数就少了。

说这么多,看得懂得话,就知道,次一级得路由得子网因为WAN-LAN这样得模式PD,实际上二级路由的子网就是被包含在一级的子网内的。 /61 0-7或者 8-F 。那么 /62 0-3 和 /62 4-7 就在 /61 0-7子网内的(/64这个除外的)。

============================================================================================================


以下是具体的案例:
pve增加ipv6管理

127.0.0.1 localhost.localdomain localhost
::1:10.0.0.230 pve.5gll.com pve

# The following lines are desirable for IPv6 capable hosts
::1 ip6-localhost ip6-loopback
fe00::0 ip6-localnet
ff00::0 ip6-mcastprefix
ff02::1 ip6-allnodes
ff02::2 ip6-allrouters
ff02::3 ip6-allhosts


systemctl restart pveproxy

aws ec2 centos7 ipv6

I can confirm that having the CentOS 7 AMI image deployed needs this to work fine :

#
#
sed -i 's/\(^SELINUX=\).*/\SELINUX=disabled/' /etc/sysconfig/selinux
sed -i 's/\(^SELINUX=\).*/\SELINUX=disabled/' /etc/selinux/config
sed -i 's/IPV6_AUTOCONF=no/IPV6_AUTOCONF=yes/' /usr/lib/python2.7/site-packages/cloudinit/net/sysconfig.py

树莓派系统 设置IPv6地址模式为eui64

有三种解决方案(注意:通常三种里面只有一种有效)

#更改sysctl.conf里的内容
net.ipv6.conf.default.addr_gen_mode = 0
net.ipv6.conf.eth0.addr_gen_mode = 0
#更改dhcpcd.conf里的内容
slaac hwaddr
#从networkmanager中修改
sudo vim /etc/NetworkManager/system-connections/"你的连接名称"
addr-gen-mode=eui64


Setting up IPv6 on AWS

Listen in the Operating System

Each Operating System has a slightly different network set up and will need a different configuration.

If you are unsure what Operating System you are running you can find out by reading this file:

cat /etc/*-release

I use vim below but you can use nano if you prefer we don’t mind. 🙂

Ubuntu 16 clients

  1. Connect into the server on the command line over IPv4 as the admin user.
  2. Find your Network Interface name
    • You can see all running network interfaces by running ifconfig, in most situations there should be two interfaces. lo is for local networking (where the traffic doesn’t leave the server) and there will be another which is what you are looking for.
    • You can also see your interfaces via the current configs: cat /etc/network/interfaces.d/50-cloud-init.cfg
    • My interface is eth0 but it will depend on your instance type what interface name you have.
  3. Create a new configuration file for IPv6.
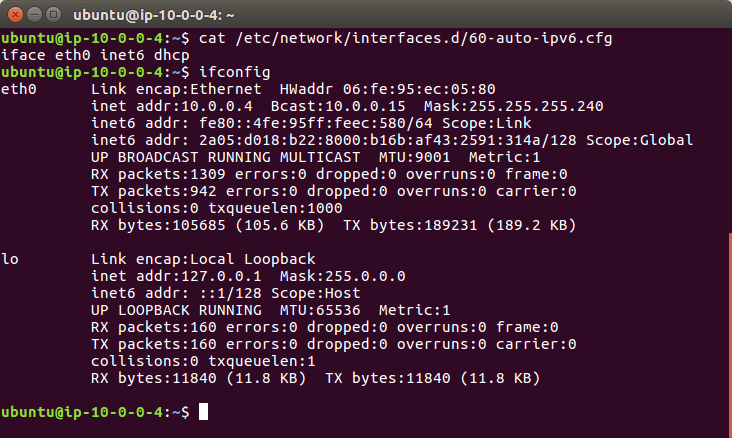
    • sudo vim /etc/network/interfaces.d/60-auto-ipv6.cfg
    • And add the following line to your file and save.
      • iface eth0 inet6 dhcp
    • If you are interested in what this line does, it binds to the interface (for me eth0) using the inet6 (IPv6) address family and uses DHCP (Dynamic Host Configuration Protocol) to get the servers IP address.
  4. And last of all to load in this new config
    • sudo service networking restart
    • OR sudo ifdown eth0 && sudo ifup eth0 replacing “eth0” with your interface name.
A configured Ubuntu 16 server

Ubuntu 14 clients

You will need to reboot your Ubuntu 14 system to load in the new static IPv6 address.

  1. Connect into the server on the command line over IPv4 as the admin user.
  2. Find out your Network Interface name
    • You can see all running network interfaces by running ifconfig
    • My interface is eth0 but it will depend on your instance type what you have.
  3. Edit the existing network interface file.
    • vim /etc/network/interface.d/eth0.cfg
    • And make sure it contains the below lines
    auto lo iface lo inet loopback auto eth0 iface eth0 inet dhcp up dhclient -6 $IFACE
    • If you are interested in what these lines do, lines 1 and 2 set up a local loopback interface this guides traffic from the server to itself which sounds strange but is used often in networking.
    • Lines 3 and 4 starts networking on eth0 using DHCP (Dynamic Host Configuration Protocol) to get the servers IP address
    • Finally line 6 starts dhclient which handles DHCP with the -6 flag to get the IPv6 address.
  4. Reboot the server. sudo reboot

RedHat Enterprise Linux 7.4 and CentOS 7.4 clients

  1. Connect into the server on the command line over IPv4 as the admin user.
  2. On version 7.4 networking is managed by cloud-init. This is a standard tool for configuring cloud servers (like EC2 instances).
  3. Create a new config file in which we will enable ipv6 and add the below options.
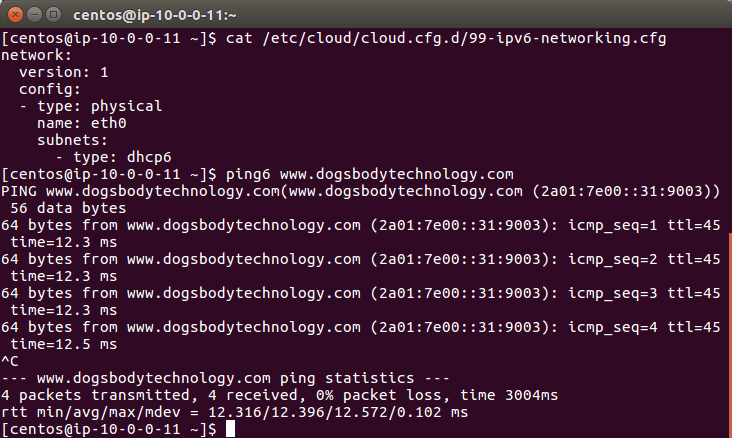
  4. vim /etc/cloud/cloud.cfg.d/99-ipv6-networking.cfg
network:
        version: 1
        config:
        - type: physical
                name: eth0
                subnets:
                - type: dhcp6
A configured CentOS 7.4 server

RedHat Enterprise Linux 7.3 and CentOS 7.3 clients

  1. Connect into the server on the command line over IPv4 as the admin user.
  2. Edit the global network settings file
  3. vim /etc/sysconfig/network
    • Update the following line to match this. This will enable IPv6 for your system.
    • NETWORKING_IPV6=yes
  4. Edit the existing network interface file.
  5. vim /etc/sysconfig/network-scripts/ifcfg-eth0
    • Enable IPv6 for the interface
    • IPV6INIT=yes
    • Enable IPv6 DHCP so the server can automatically get its new IPv6 address
    • DHCPV6C=yes
    • Disable the Network Manager daemon so it doesn’t clash with AWS network services
    • NM_CONTROLLED=no
  6. sudo service network restart

设置openwrt路由器的防火墙_允许从外网访问内网的ipv6服务

家用宽带目前很多都部署了IPv6,家用路由器目前Padavan/Openwrt等系统都能较好地支持了IPv6。不过要充分利用IPv6链接设备,有些坑。

动态变化的IPv6地址

首先是IPv6地址,不同设备(操作系统)获取的IPv6地址有区别,较为通用的是【无状态EUI-64地址】,操作系统通过网卡的mac地址生成一个64位固定后缀,以及路由器下发的64位前缀,合成一个固定的IPv6地址。作为服务端,【无状态EUI-64地址】是较为适合的,Linux发行版很多组件(systemd-netword,dhcpcd等)默认都采用EUI-64地址。

另外还有通过DHCPv6下发的地址,这个就不大可控,跟DHCPv6服务器和终端客户有关,特点是生成的后缀较短。

此外,家用宽带ISP提供的IPv6前缀是不定期变化的。可见要访问家庭宽带内网的设备,光是地址就存在了蛮多的变化因素。

IPv6的【隐私扩展地址】

终端设备,比如手机、工作站版本Windows等设备,则使用【隐私扩展】的方式随机生成64位后缀,这样终端的地址每次链接时候都会随机改变,访问外部资源时候可避免被追踪。

如果要连接Windows远程桌面,安装的是工作站版本,系统默认已经启用【隐私扩展】,主机地址就是随机变化的,想要连接3389就很麻烦了,不过这个特性可以关闭。服务器版本的Windows默认不启用隐私扩展,而家庭版Windows不支持远程桌面[doge]。

管理员权限的CMD下执行

  • netsh interface ipv6 set global randomizeidentifiers=disabled store=active
  • netsh interface ipv6 set global randomizeidentifiers=disabled store=persistent
  • netsh interface ipv6 set privacy state=disabled store=active
  • netsh interface ipv6 set privacy state=disabled store=persistent

IPv6防火墙ip6tables

要从外网通过IPv6访问家里路由器下的设备,最关键一点是路由器上的防火墙要允许这样的转发。

Padavan/Openwrt都是基于Linux – ip6tables的防火墙。默认情况下,ip6tables只允许了v6子网内的设备被ping,只允许特定类型的ICMPv6报文通过,其他通信报文一律丢弃了。所以虽然IPv6下每个设备都有公网地址,但是还不至于不安全到每个设备都可让人随便连。

动态匹配EUI-64后缀

考虑到前缀变化因素,要访问特定设备,就是让IPTABLES匹配特定设备的EUI-64后缀放通这个地址:

  • ip6tables -I FORWARD -d ::abcd:1234:5678:90ef/::ffff:ffff:ffff:ffff -j ACCEPT

可见iptables对v6地址的匹配掩码可以非常灵活,不像v4下只按前缀适配。坑的就是这个特征是没有文档的,目前文档中写的mask解释还是适配IPv4的内容,有人专门发邮件去netfilter列表问了才知道。IPv6地址中,双冒号::的写法代表是前/后均为0位,双冒号只能出现一次。

Openwrt中配置转发规则

Padavan中设置转发规则

其实padavan中的防火墙功能并没有配置地址匹配转发规则的功能界面,只能在自定义脚本中写原始的iptables命令。截图中使用的padavan是增加了QOS组件的老毛子版本。

padavan-ip6tables

以上。

参考文章:

现在家庭宽带的运营商,都已经提供 ipv6 了。
当你拨号上网后,运营商给你的路由器分配一个 ipv6 的同时,还会给你分配一个 ipv6 的前缀。
这样,你路由器后面的所有设备都会得到一个公网的 ipv6 地址。
但是,你会发现,内网的设备,虽然有公网ipv6地址,但无法从外网访问它们。仅能从外网ping通它们。
这是因为路由器的缺省设置。为了保护内网设备,缺省没有把内网设备暴露到公网上,仅仅允许从公网ping它们。

如果你内网有一台机器,提供了https或别的什么的服务,需要允许从公网访问它。
就需要修改路由器防火墙的设置,允许从公网访问这台机器的指定端口。

OpenWRT 的防火墙设置:

添加一个规则:

返回后,可以看到有一个”未命名的规则”,编辑它:

按需设置:

  • 内网设备的ipv6地址,
    前半部分是ipv6前缀,是运营商分配的。重拨后会变化。
    后半部分,如果不是eui64,就是随机生成的,也会变。如果是eui64,则与mac地址相关,不会变化,除非换网卡。
  • 如果整个ipv6都会变,防火墙规则就没办法写了。除非全网放行(内网目标地址掩码填::/0any)。
  • 所以配置内网设备的ipv6地址为eui64,防火墙的内网目标地址掩码填 ::xxxx:xxxx:xxxx:xxxx/::FFFF:FFFF:FFFF:FFFF, 这样就比较安全了。
    (ipv6地址掩码比v4灵活,v6可以掩前面,也可以掩后面。v4就只能掩前面)比如: 你的ipv6地址为,2408:ebcd:ebcd:ebcd:5678:5678:5678:5678
    则目标地址掩码填, 0:0:0:0:5678:5678:5678:5678/0:0:0:0:FFFF:FFFF:FFFF:FFFF
    连续的 0 简写为两个冒号,即,::5678:5678:5678:5678/::FFFF:FFFF:FFFF:FFFF
  • 设置Linux的ipv6为eui64模式,请参考:(Linux ipv6 无状态 设置为 eui64)
  • 获取本机ipv4/ipv6,更新ddns,请参考:(Linux中获取本机的最新IPv6地址_更新ddns的脚本)

—end—

CentOS7网卡IPv6配置文件

TYPE=Ethernet        //网络类型:Ethernet以太网
BOOTPROTO=static        //引导协议:dhcp自动获取、static静态、none不指定
NM_CONTROLLED        //是否受network程序管理
USERCTL        //普通用户是否可以控制网卡
DEFROUTE=yes        //是否启用默认路由
IPV4_FAILURE_FATAL=no        //是否启用IPV4错误检测功能
IPV6INIT=no       //是否IPV6协议
IPV6_AUTOCONF=no        //是否自动配置IPV6地址
IPV6_DEFROUTE=no        //是否启用IPV6默认路由
IPV6_PEERDNS=no        //是否通过DHCP服务器获取DNS地址(IPV6)
IPV6_PEERROUTES=no        //是否通过DHCP服务器获取网关的路由信息(IPV6)
IPV6_PRIVACY=yes         //是否隱藏真實IPv6
IPV6_FAILURE_FATAL=no        //是否启用IPV6错误检测功能

Force Apt-Get to IPv4 or IPv6 on Ubuntu or Debian

In this guide, we will configure apt-get to use only IPv4 or IPv6. This guide targets Ubuntu 14.04 and Debian Jessie, but may work for newer versions as well.

Fast command line option

If you want to force the apt-get to use IPv4 or IPv6 only one time, follow these steps. This feature is available after the 0.9.7.9~exp1 version of apt-get. First, make sure your version of apt-get is newer than 0.9.7.9~exp1 by running the following command:

apt-get --version

The result will be something like this:

apt 1.0.1ubuntu2 for amd64 compiled on Oct 28 2014 20:55:14

If the version checks out, then you can force IPv4 with:

apt-get -o Acquire::ForceIPv4=true update

or IPv6:

apt-get -o Acquire::ForceIPv6=true update

This will update the repositories resolving the URLs in sources.list to IPv4 only.

Persistent option

To make the setting persistent, create the file 99force-ipv4 in /etc/apt/apt.conf.d/.

sudoedit /etc/apt/apt.conf.d/99force-ipv4

Put the following contents in it:

Acquire::ForceIPv4 "true";

Save the file, and you’re good to go. If you want to force IPv6 instead, change the 4 to 6 in the file name and settings. To choose between one of them, test with the fast method and see which works better.