密码保护:AWS CloudFront CDN 详细图文部署教程及自选优质 IP 方法
要查看留言请输入您的密码。
I can confirm that having the CentOS 7 AMI image deployed needs this to work fine :
#
#
sed -i 's/\(^SELINUX=\).*/\SELINUX=disabled/' /etc/sysconfig/selinux
sed -i 's/\(^SELINUX=\).*/\SELINUX=disabled/' /etc/selinux/config
sed -i 's/IPV6_AUTOCONF=no/IPV6_AUTOCONF=yes/' /usr/lib/python2.7/site-packages/cloudinit/net/sysconfig.py
Each Operating System has a slightly different network set up and will need a different configuration.
If you are unsure what Operating System you are running you can find out by reading this file:
cat /etc/*-release
I use vim below but you can use nano if you prefer we don’t mind. 🙂
ifconfig, in most situations there should be two interfaces. lo is for local networking (where the traffic doesn’t leave the server) and there will be another which is what you are looking for.cat /etc/network/interfaces.d/50-cloud-init.cfgeth0 but it will depend on your instance type what interface name you have.sudo vim /etc/network/interfaces.d/60-auto-ipv6.cfgiface eth0 inet6 dhcpsudo service networking restartsudo ifdown eth0 && sudo ifup eth0 replacing “eth0” with your interface name.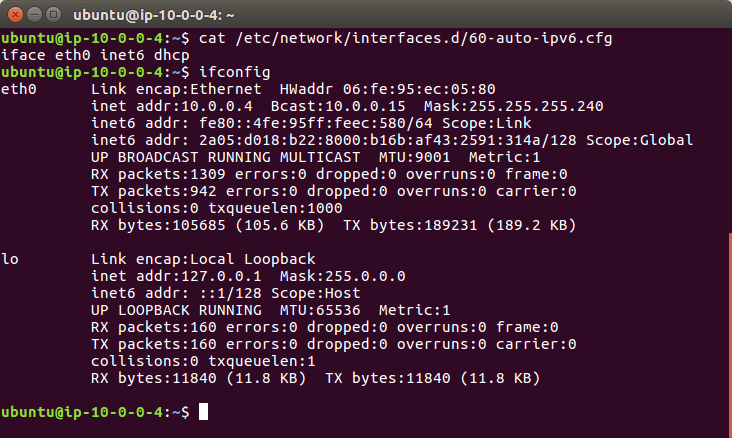
You will need to reboot your Ubuntu 14 system to load in the new static IPv6 address.
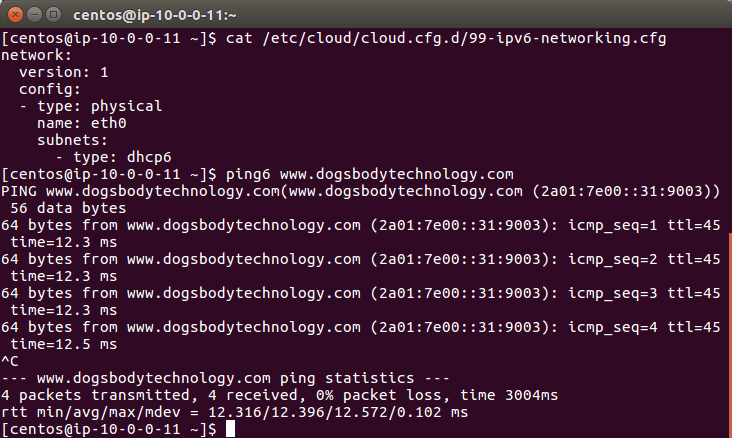
ifconfigeth0 but it will depend on your instance type what you have.vim /etc/network/interface.d/eth0.cfgsudo rebootvim /etc/cloud/cloud.cfg.d/99-ipv6-networking.cfgnetwork:
version: 1
config:
- type: physical
name: eth0
subnets:
- type: dhcp6
vim /etc/sysconfig/networkNETWORKING_IPV6=yesvim /etc/sysconfig/network-scripts/ifcfg-eth0IPV6INIT=yesDHCPV6C=yesNM_CONTROLLED=nosudo service network restart