Extract the files from the rpi-boot-eeprom-recovery zip file into a temporary folder. These files will be recovery.bin, pieeprom.bin and README.txt.
Now put those 3 files directly on the root of your blank FAT32 formatted SD card. Your recovery card is now prepped and ready!
Before powering up your device make sure that all USB devices are removed. Even keyboards have been known to cause issues so make sure absolutely everything is unplugged!
Now insert the SD card into the Pi and connect the power.
If the bootloader recovery is successful the green activity light will start blinking rapidly continuously (forever). In this case you have successfully recovered your bootloader! You may now insert a normal fully imaged SD card and it will boot normally again.
If anything other than a continuous rapidly blinking green light happens the recovery was not successful.
If Recovery Doesn’t Work
There is a known (and strange) issue with Raspberry Pi 4’s and 32 GB SD cards where the Pi will abort the boot. If this might apply to you then read this post.
Make sure you created your SD card correctly. A common pitfall is using cards above 32 GB and formatting them with ex-FAT instead of regular FAT/FAT32.
Make sure *all* USB devices are unplugged from the Pi
Try a different SD card if you have one available. SD cards do go bad all the time. If there’s any doubt here check out my Raspberry Pi storage benchmarks page to see the highest performing SD cards (you definitely want an A1 rated one).
Check your power cord. Make sure you are using a high quality USB-C power cord that is compatible with the Pi. Even if it was working before I have had several old Pi power supplies that worked for years die on me. If there’s any doubt grab a known reliable one like the Canakit USB-C Raspberry Pi 4 Power Supply
If you’ve gone through all the steps and are positive it’s not one of the above “gotcha” issues then it’s time to go deeper. You need to observe your Pi’s exact behavior when you plug it in (what the lights are doing). Here is a table of different blink patterns and what they mean:
Raspberry Pi 4 LED blink warning table
If your Pi’s LED behavior matches any of these codes then we now have much more to go on to diagnose why your Pi won’t boot. Some of them are very obvious but they’re all worth a quick web search once you have matched it to a code.
If your Pi’s behavior does not match one of these codes head to the official sticky post on the Raspberry Pi forums and scroll to the very bottom (post #4 specifically for Raspberry Pi). This tracks ongoing boot issues with the Pi 4 that may affect your Pi and a whole bunch of things to try. If you get through that post go all the way up to post #1 and start going down the list.
I was tasked to implement VOIP system in a small company with about 20 staff in Singapore and about 10 staff in India office.To understand how VOIP work, and how VOIP can communicate with Analog phone system, I have purchase the Linksys SPA3102 ATA (About Singapore S$90 From Sim Lim Mediapro), try to understand how everything can work together.I have tried to google for document how SPA3102 work in Singapore environment, but without success. I managed to find information on how to setup SPA3102 with Freepbx, but document was long and not very easy to read and follow. So I decided to write this document, hoping anyone like me, being task to setup VOIP, can follow and understand.
Purpose of the Lab setup
The purpose for this lab setup, is to install FreePBX, with few extension number, and I have a home analog line (PSTN line), and wanted any of the few extension number from softphone able to make a call out thru this analog line. Objective 2 is off course to allow incoming call from analog line, to go to an Interactive voice respond menu, and select the option, and forward the call to the selected extension or softphone.Rest of the FreePBX feature, is not in this lab scope, and you should be able to find a lot of information on asterisk feature.There are also a lot of document covering on SPA3102 to connect to SIP service provider (In Singapore, service provider like hoiio), this document will not cover those too.
Setup step (Summary)
1. Setup the hardware (SPA3102)2. Setup the FreePBX3. Configure FreePBXa. Setup Extension4. Setup Softphone5. Configure FreePBXa. Setup SIP Trunkb. Setup Outbound Routec. Setup Inbound Route6. Configure SPA3102 to link to FreePBX
Hardware Setup
I assume that you have some network setup knowledge, setup the hardware as below.
1. Once above is setup, power on the SPA3102 device2. Using the analogue phone, press “****”, and after the greeting message press 110# to retrieve the Internet/WAN IP address. Take a note of this IP Address.3. Press “7932#” and then press “1#” to enable the HTTP Configuration over the WAN port. Now, press “1″ to save.4. Now point your browser to the gateway device’s configuration page: “http://x.x.x.x”, where “x.x.x.x” is the IP Address assigned to the device by the DHCP Server.5. Once the page loads click on the “Admin Login” link on the top right hand side of the page. This will provide the basic administration configuration version of the interface.6. Now click on the “advanced” link on the top right hand side of the page. This will provide the advanced administration configuration version of the interface.7. If you are able to access to the above, put the hardware one side, and setup the FreePBX.
Above instruction extracted from http://www.3cx.com/voip-gateways/linksys-spa3102/Above picture extracted from http://hacsatel.hu/termek/cisco-spa3102-eu-single-port-router-with-1-phone-port-and-1-fxo-port–europe-/
FreePBX setup
1. Create a virtual machine for the environment.2. Download the FreePBX from http://www.freepbx.org/freepbx-distro3. Follow the step by step installation
4. Use the browser to point to the IP address, example above http://172.16.138.1055. If you are able to access to the page, setup the extension number.
Extension Number setup in FreePBX
1. Go to Application, click on Extensions
2. Select “Generic SIP Device” and click “Submit”
3. Select “Generic SIP Device” and click “Submit”
4. Full in only the important fieldsa. User Extensionb. Display Namec. Secret (Password)5. Click on Submit.
6. Click on “Apply Config” on the top.7. Repeat above to create a few more extension number.8. Next ready to use the extension using the softphone.
Install Softphone (one on PC, and one on Smartphone)
1. On the windows OS, install x-lite2. Configure the xlite account
3. Key in the Account Name (what key in FreePBX)4. Key in the User ID (Extension Number in FreePBX)5. Key in the IP address of the FreeBPX server6. Key in the Password (Secret in FreePBX)7. Click on “OK”8. Install another xLite on another PC, or install Zoiper on Smartphone (Android)9. If you are setting up Zoiper for another extension, the setting are similar, Account Name, Host, Username (Extension in FreePBX) and password (Secret in FreePBX).10. Test to call from one extension to another extension, and see the call get thru.11. If the call go thru, you are ready for the next step.
Configure FreePBX – SIP Trunk (for SPA3102 Analog Line Connection)
Extract from http://www.freepbx.org/support/documentation/howtos/howto-linksys-spa-3102-sipura-spa-3000-freepbx
1. Create a new SIP trunk in FreePBX.
2. Go to Connectivity and click on Trunks
3. For Caller ID put my inbound DID From Singtel POTS line.
4. Max channels, put 1 since it’s only one line. This is important because if you don’t do this, and this trunk is busy, calls may not fall through properly to the next trunk.
5. Trunk name: Call this 1-pstn6.
7. Click on “Submit Changes”
8. Click on “Apply Config” on top
Configure FreePBX – Outgoing Route (for all extension to call out thru analog line)
Extract from http://www.freepbx.org/support/documentation/howtos/howto-linksys-spa-3102-sipura-spa-3000-freepbx
1. Create a new Outbound Routes
2. Name of the route : Spa30003. No password for the route4. The important setting here is the Dial Patterns. I have only configured to dial 9, to call an external number. Example, on the softphone dial 991231234, will put a call to PSTN line “91231234”. If you dial normal extension number, it will still go to extension number.
5. Set the Trunk Sequence 0 to use “1-pstn”
6. Click on the “Submit”
7. Click on the “Apply Change” on top.
Configure FreePBX – Incoming Route (for incoming call from analog line to go to one fixed extension)
Extract from http://www.freepbx.org/support/documentation/howtos/howto-linksys-spa-3102-sipura-spa-3000-freepbx
1. Create a new inbound Route
2. Name of the route setup as “1-pstn”3. DID number set to the DID number, this number must EXACTLY match the number you put in “Dial Plan 2” in SPA3102 PSTN Line setting
4. Set Destination as extension number to go to, or setup as IVR.5. Submit Changes and remember to click the “Apply Change” for the update.
Configure SPA3102 to link to FreePBX
1. Browse to the SPA2102 admin page, and go to advance setting
SIP Tab
2. Before you do anything else, go to the SIP tab. Look under RTP Parameters and check the RTP Packet Size. Linksys has set this to 0.030 by default, which is not correct for use on ulaw (G711u codec) connections. Change it to 0.020 instead (or 0.02 on older Sipura devices). If you don’t do this, you may experience strange problems with “choppiness” or random clicks on some calls but not others, and you may also experience problems when playing Asterisk sound files.3. Next go to PSTN Tab
PSTN Tab
Proxy and Registration
1. Line enable set to Yes.
2. SIP Port is set to port 5061 (same as FreePBX port number in the trunk setup)
3. Proxy set to the FreePBX IP address of your Asterisk box
4. Make Call Without Reg: Yes5. Ans Call Without Reg: Yes6. Register Expires: 300
Subscriber Information
1. Display name: Put something here that will identify this line – this is only displayed on your phones if you get a call with no Caller ID information (or you don’t subscribe to Caller ID). Keep it at 15 characters or shorter. You could use something like LOCAL PSTN CALL.2. User ID: 1-pstn ; very important – this must exactly match the FreePBX Trunk name and username in the trunk configuration!3. Password: XXXXXX (same as you used in FreePBX Trunk settings).
Audio Configuration
1. DTMF Process INFO: Yes
2. DTMF Process AVT: Yes
3. DTMF Tx Method: Auto
Dial Plans
1. Under Dial Plans it’s important not to change the default (xx.) on any except Dial Plan 2.2. Dial Plan 2 set as (S0<:1234567890>)3. Replace 1234567890 with the telephone number of the PSTN line coming into the device. Note that this must exactly match the DID number in your FreePBX Inbound Route setting for this device. If the number here and in the Inbound Route don’t match exactly, you won’t receive incoming calls.
VoIP-To-PSTN Gateway Setup
This is another important settings section.
1. VoIP-To-PSTN Gateway Enable: yes
2. VoIP Caller Auth Method: None ; use “None” to start, you can change later for added security
3. VoIP PIN Max Retry: 3
4. One Stage Dialing: Yes ; very important
5. Line 1 VoIP Caller DP: none
6. VoIP Caller Default DP: none
7. Line 1 Fallback DP: none
PSTN-To-VoIP Gateway Setup
This is another important settings section.
1. PSTN-To-VoIP Gateway Enable: Yes
2. PSTN Caller Auth Method: none
3. PSTN Ring Thru Line 1: no ; I use Asterisk for my routing.
4. PSTN Pin Max Retry: 3
5. PSTN CID for VoIP CID: Yes if you subscribe to CallerID service on your PSTN line, otherwise No
6. PSTN CID Number Prefix: (Leave Blank)
7. PSTN Caller Default DP: 2 ; important – here is where it sends the calls to.
8. Off Hook While Calling VoIP: No
9. Line 1 Signal Hook Flash To PSTN: Disabled
10. PSTN CID Name Prefix: (Leave Blank)
11. Leave everything else in this section blank.
FXO Timer Values (sec)
1. Voip Answer Delay: 0 (The original recommendation was 1, but this can cause a spurious half ring on outgoing calls, before actual ringing from the called line commences, so 0 is now the recommended value).
2. PSTN Answer Delay: If you do not subscribe to CallerID service on your PSTN line, this can be set to 0. Most users will want to set it to at least 3 so that the incoming CallerID data is captured. In rare situations you may need a slightly longer delay (5 should be more than enough).
PSTN Disconnect Detection
1. For Singapore Singtel Phone line, please change Discount Tone to
425@-30,425@-30; 2(0.75/0.75/1+2)
International Control
Check the settings here – each country uses different values for PSTN lines. If you live in Australia, Canada, the United States or most other countries with modern telephone systems you probably won’t have to change anything except perhaps the gain levels, so we’ll only deal with them for now. The default values for both the SPA To PSTN Gain and the PSTN To SPA Gain are 0 (zero), and that’s where you should leave them when you’re first setting up the SPA-3000/3102. But just so you know, here’s some information on those settings:
1. If the SPA to PSTN gain is set too low, the parties on the PSTN side of the connection will probably complain about your volume being too low, or will ask you to speak up or talk closer to the phone. If it is set too high, however, you are more likely to hear echo, and outgoing calls may fail because the level of DTMF tones sent by the SPA-3000/3102 will be too “hot” to register properly at the PSTN switching equipment.
2. If the PSTN To SPA Gain is set too low, you’ll hear low volume levels on PSTN calls. If it’s set too high, the people on the PSTN side of the connection will be more likely to hear echo (they may hear their own voices echoed back from your end). Also, any echo that has been reflected back to you will be heard at a higher volume level, and will therefore be more objectionable.
3. While the default levels are usually adequate, we found that boosting both values up to 3 produced a more “natural” sounding volume level in both directions. However, this is very much dependent on the characteristics of the PSTN line – if you’re on a very short loop, values of 0 may be adequate for both settings, if on a very long loop you may need to go even higher than 3. The valid range is -15 dB to 12 dB in 1 dB increments (but just enter a numeric value, do not enter “dB” in the text field). If you have actual test equipment available you can fine-tune the volume settings for best results.
4. I have not play with this number yet, but gain of zero is ok now.
Extract from http://www.freepbx.org/support/documentation/howtos/howto-linksys-spa-3102-sipura-spa-3000-freepbx
Test incoming and outgoing line
1. Call you DID analog number, and check if it go to the extension or IVR.2. From your softphone, call 9xxxxxxxx, and see if it call the external number.
Each Operating System has a slightly different network set up and will need a different configuration.
If you are unsure what Operating System you are running you can find out by reading this file:
cat /etc/*-release
I use vim below but you can use nano if you prefer we don’t mind. 🙂
Ubuntu 16 clients
Connect into the server on the command line over IPv4 as the admin user.
Find your Network Interface name
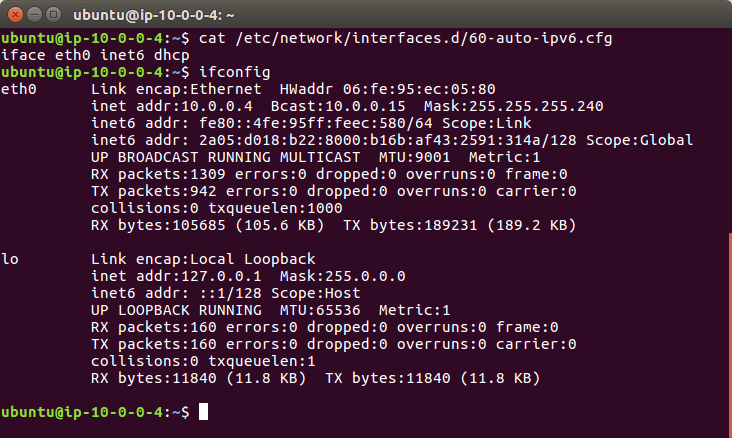
You can see all running network interfaces by running ifconfig, in most situations there should be two interfaces. lo is for local networking (where the traffic doesn’t leave the server) and there will be another which is what you are looking for.
You can also see your interfaces via the current configs: cat /etc/network/interfaces.d/50-cloud-init.cfg
My interface is eth0 but it will depend on your instance type what interface name you have.
Create a new configuration file for IPv6.
sudo vim /etc/network/interfaces.d/60-auto-ipv6.cfg
And add the following line to your file and save.
iface eth0 inet6 dhcp
If you are interested in what this line does, it binds to the interface (for me eth0) using the inet6 (IPv6) address family and uses DHCP (Dynamic Host Configuration Protocol) to get the servers IP address.
And last of all to load in this new config
sudo service networking restart
OR sudo ifdown eth0 && sudo ifup eth0 replacing “eth0” with your interface name.
Ubuntu 14 clients
You will need to reboot your Ubuntu 14 system to load in the new static IPv6 address.
Connect into the server on the command line over IPv4 as the admin user.
Find out your Network Interface name
You can see all running network interfaces by running ifconfig
My interface is eth0 but it will depend on your instance type what you have.
Edit the existing network interface file.
vim /etc/network/interface.d/eth0.cfg
And make sure it contains the below lines
auto lo iface lo inet loopback auto eth0 iface eth0 inet dhcp up dhclient -6 $IFACE
If you are interested in what these lines do, lines 1 and 2 set up a local loopback interface this guides traffic from the server to itself which sounds strange but is used often in networking.
Lines 3 and 4 starts networking on eth0 using DHCP (Dynamic Host Configuration Protocol) to get the servers IP address
Finally line 6 starts dhclient which handles DHCP with the -6 flag to get the IPv6 address.
Reboot the server. sudo reboot
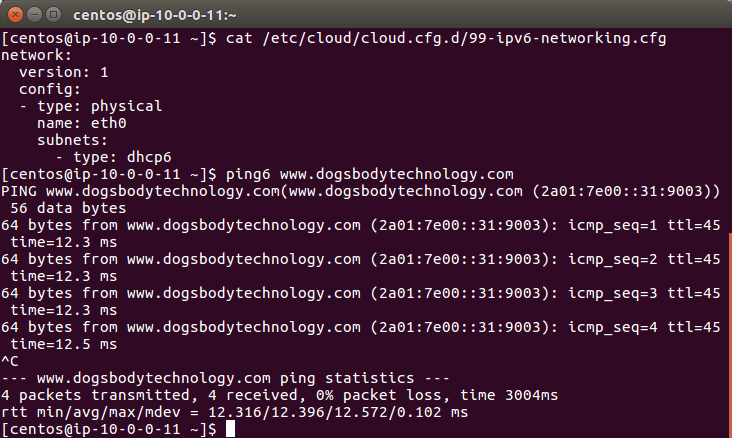
RedHat Enterprise Linux 7.4 and CentOS 7.4 clients
Connect into the server on the command line over IPv4 as the admin user.
On version 7.4 networking is managed by cloud-init. This is a standard tool for configuring cloud servers (like EC2 instances).
Create a new config file in which we will enable ipv6 and add the below options.