#
#首先复制全部文件
 sudo cp -Rf /mnt/p2/var/lib/mysql/* /var/lib/mysql/
#授予权限
chown -R mysql:mysql /var/lib/mysql
#
#绑定SD卡
sudo mount /dev/mmcblk0p2 /mnt/p2
# #首先复制全部文件 sudo cp -Rf /mnt/p2/var/lib/mysql/* /var/lib/mysql/ #授予权限 chown -R mysql:mysql /var/lib/mysql
# #绑定SD卡 sudo mount /dev/mmcblk0p2 /mnt/p2
Each Operating System has a slightly different network set up and will need a different configuration.
If you are unsure what Operating System you are running you can find out by reading this file:
cat /etc/*-release
I use vim below but you can use nano if you prefer we don’t mind. 🙂
ifconfig, in most situations there should be two interfaces. lo is for local networking (where the traffic doesn’t leave the server) and there will be another which is what you are looking for.cat /etc/network/interfaces.d/50-cloud-init.cfgeth0 but it will depend on your instance type what interface name you have.sudo vim /etc/network/interfaces.d/60-auto-ipv6.cfgiface eth0 inet6 dhcpsudo service networking restartsudo ifdown eth0 && sudo ifup eth0 replacing “eth0” with your interface name.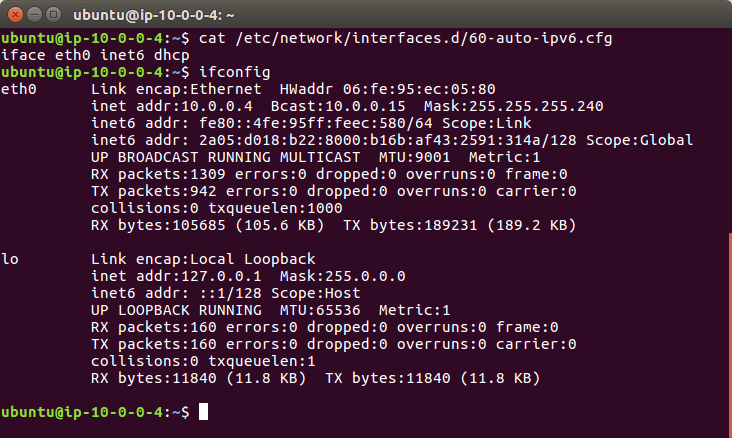
You will need to reboot your Ubuntu 14 system to load in the new static IPv6 address.
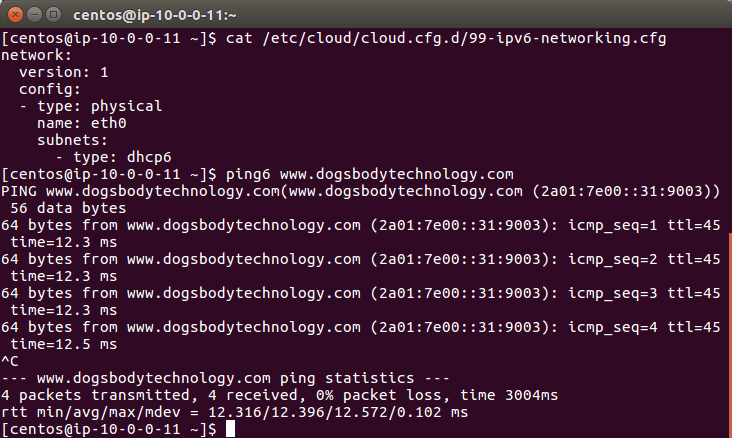
ifconfigeth0 but it will depend on your instance type what you have.vim /etc/network/interface.d/eth0.cfgsudo rebootvim /etc/cloud/cloud.cfg.d/99-ipv6-networking.cfgnetwork:
version: 1
config:
- type: physical
name: eth0
subnets:
- type: dhcp6
vim /etc/sysconfig/networkNETWORKING_IPV6=yesvim /etc/sysconfig/network-scripts/ifcfg-eth0IPV6INIT=yesDHCPV6C=yesNM_CONTROLLED=nosudo service network restartimport sys
print sys.argv[0]
sys.argv[0]是python脚本的名字;
下面的例子是一个用来提取文本log.txt中含有匹配字符串的文本行,匹配字符串的字符串当作参数传递给python脚本。
#!/usr/bin/env python
import sys
import re
f = open(“log.txt”, “rb”)
info = open(“info.txt”, “ab”)
for line in f.readlines():
if re.search(sys.argv[1], line):
info.write(line)
info.close()
f.close()
Python文件内部接收参数用:
sys.argv
sys.argv[0]:是python脚本名
sys.arg[1]及以后各项:是接收的参数
#! /bin/python
import sys
for arg in sys.argv:
print arg
需要模块:sys
参数个数:len(sys.argv)
脚本名: sys.argv[0]
参数1: sys.argv[1]
参数2: sys.argv[2]
test.py
import sys
print “脚本名:”, sys.argv[0]
for i in range(1, len(sys.argv)):
print “参数”, i, sys.argv[i]
>>>python test.py hello world
脚本名:test.py
参数 1 hello
参数 2 world
python中使用命令行选项:
例如我们需要一个convert.py脚本。它的作用是处理一个文件,并将处理后的结果输出到另一个文件中。
要求该脚本满足以下条件:
1.通过-i -o选项来区别参数是输入文件还是输出文件.
>>> python convert.py -i inputfile -o outputfile
2.当不知道convert.py需要哪些参数时,用-h打印出帮助信息
>>> python convert.py -h
getopt函数原形:
getopt.getopt(args, options[, long_options])
import sys, getopt
opts, args = getopt.getopt(sys.argv[1:], “hi:o:”)
input_file=””
output_file=””
for op, value in opts:
if op == “-i”:
input_file = value
elif op == “-o”:
output_file = value
elif op == “-h”:
usage()
sys.exit()
代码解释:
a) sys.argv[1:]为要处理的参数列表,sys.argv[0]为脚本名,所以用sys.argv[1:]过滤掉脚本名。
b) “hi:o:”: 当一个选项只是表示开关状态时,即后面不带附加参数时,在分析串中写入选项字符。
当选项后面是带一个附加参数时,在分析串中写入选项字符同时后面加一个”:”号。
所以”hi:o:”就表示“h”是一个开关选项;
“i:”和”o:”则表示后面应该带一个参数。
c) 调用getopt函数。函数返回两个列表:opts和args。
opts为分析出的格式信息。args为不属于格式信息的剩余的命令行参数。
opts是一个两元组的列表。每个元素为:(选项串,附加参数)。如果没有附加参数则为空串”。
getopt函数的第三个参数[, long_options]为可选的长选项参数,上面例子中的都为短选项(如-i -o)
长选项格式举例:
–version
–file=error.txt
让一个脚本同时支持短选项和长选项
getopt.getopt(sys.argv[1:], “hi:o:”, [“version”, “file=”])
1:5种URL规则的定义及使用场景
当您设置页面,页面组和转化时,Ptengine支持5种URL规则:包含、头匹配,尾匹配,完全匹配,正则表达式。
包含:任何包含您特定字符串的的URL。例如,如果您指定“abc.com”使用“包含”规则:那么“abc.com.contact”等类似的URL将使用此规则。
头匹配:从字符串开头的第一个字符一直匹配到您特定的最后一个字符,也许还有其他剩余的字符,但是遵循相同的规则。
例如,特定访问者访问的网址可能是 http://www.example.com/checkout.cgi?page=1&id=9982251615, 在这一情况下,其他每位用户的 id 都会不同。您只要使用 http://www.example.com/checkout.cgi?page=1 作为目标网址,并选择”头匹配”作为匹配类型,仍可以匹配此页。
尾匹配:从字符串结尾的最后一个字符一直匹配到您指定的第一个字符,也许还有其他剩余的字符,但是遵循相同的规则。
例如,特定访问者访问的网址可能是“http://www.example.com/checkout.cgi?page=1&id=9982251615,在这一情况下,您希望使用“&ID = 9982251615”为目标字符,请选择”尾匹配”作为匹配类型。
完全匹配:从头到尾完全匹配网址中的每一个字符。
正则表达式,正则表达式会将特殊字符视为通配符,这是一种非常灵活的匹配方式。如果网站上同一网页网址的主体或后续参数会发生变化,或者两者都会发生变化,这个方式就相当实用。
2:正则表达式的语法
其实, 正则表达式是对字符串操作的一种逻辑公式,就是用事先定义好的一些特定字符、及这些特定字符的组合,组成一个“规则字符串”,这个“规则字符串”用来表达对字符串的一种匹配逻辑。
正则表达式字符主要包含:通配符、定位符、分组、其它。
通配符,可以用来代替一个或多个真正字符,以便根据您指定的参数变化的所有实例创建一个匹配。 下面是一些经常使用通配符说明。
定位符 创建基于固定点的匹配,通常在开始或结束的位置。 分组
分组

注:正则表达式越简单越好,以便于您和同事接下来的方便使用。
3:正则表达式的常见用法
正则表达式的常见用法
1.前方域名完全匹配 ,尾部带/或带?加参数
正则:^https:\/\/www.ptmind.com($|\/$|\/\?.*)
能匹配以下页面:
https://www.ptmind.com
https://www.ptmind.com/
https://www.ptmind.com/?WT.mc_id=xxxx
不能匹配以下页面:
https://www.ptmind.com/abc
2.头部匹配http或者https协议,并且匹配多个子域名
正则:^(http|https):\/\/(sh|bj|tj).ptmind.com
匹配以下页面:
http://sh.ptmind.com
http://bj.ptmind.com/abc
http://tj.ptmind.com
https://sh.ptmind.com
https://bj.ptmind.com/?WT.mc_id=xxxx
https://tj.ptmind.com
不能匹配以下页面:
https://www.ptmind.com
3.指定头部匹配规则
正则:^http:\/\/ptmind\.com\/price.*$
匹配以下页面:
http://ptmind.com/price/page
http://ptmind.com/price?sid=23fwe3r2&vid=345666
http://ptmind.com/price#top
http://ptmind.com/price
4.匹配 http 或 https开头链接,也可匹配不包含www或将www替换成其它由字母数字组合的子域名的情况
正则:^(http|https):\/\/[a-z0-9]*[.]*ptmind.com\/service\/mng_units\/lp03$
匹配以下页面:
http://www.ptmind.com/service/mng_units/lp03
https://www.ptmind.com/service/mng_units/lp03
http://ptmind.com/service/mng_units/lp03
http://a123.ptmind.com/service/mng_units/lp03
https://ptmind.com/service/mng_units/lp03
5.匹配末尾数据必须在(6984604到6984783之间)
正则:^http:\/\/ptmind.com\/detail\/id=6984([6][1-9][0-9]|[6][0][4-9]|[7][0-7][0-9]|[7][8][0-3])$
匹配以下页面:
http://ptmind.com/detail/id=6984604
http://ptmind.com/detail/id=6984783
不能匹配以下页面:
http://ptmind.com/detail/id=6984784
http://ptmind.com/detail/id=6984603
若您依然需要帮助,可以联系我们的在线客服寻求帮助。
4:正则表达式的校验工具
引用:
https://github.com/mzz2017/lkl-haproxy
#
# for centos
bash <(curl -Ls https://github.com/mzz2017/lkl-haproxy/raw/master/lkl-haproxy-centos-nocheckvirt.sh)

# for debian
bash <(curl -Ls https://github.com/mzz2017/lkl-haproxy/raw/master/lkl-haproxy-debian-nocheckvirt.sh)


自从树莓派4发布以来,就不支持直接从U盘或者SSD启动,随着树莓派官方不断更新EEPROM,目前树莓派已经支持直接从U盘/SSD启动,无需再使用SD作为引导了。
检查并更新自己的EEPROM固件版本
#安装
sudo apt install rpi-eeprom

#检查并更新自己的EEPROM固件版本
sudo rpi-eeprom-update

#安装最新的版本
sudo rpi-eeprom-update -a
sudo reboot

我们看官方文档,2020年5月15日beta版本支持usb引导

根据官方文档我们要改一个文件,加载beta版的固件, 编辑/etc/default/rpi-eeprom-update文件,将FIRMWARE_RELEASE_STATUS的值从 “critical “改为 “beta”。
#根据官方文档我们要改一个文件,加载beta版的固件, 编辑

nano /etc/default/rpi-eeprom-update

FIRMWARE_RELEASE_STATUS="beta"

然后手动加载beta版固件

#更新bootloader

sudo apt update
sudo apt full-upgrade

#如果安装指定的版本
sudo rpi-eeprom-update -f /lib/firmware/raspberrypi/bootloader/beta/pieeprom-2020-06-15.bin
sudo rpi-eeprom-update -d -f /lib/firmware/raspberrypi/bootloader/stable/pieeprom-2020-06-15.bin
sudo reboot

vcgencmd bootloader_version

vcgencmd bootloader_config
重新启动设备,就可以支持从USB引导了。这样我们可以使用更快,更多类型的设备来引导系统了。

要将Raspberry Pi新安装的Raspberry Pi烧录到你的USB盘上,请使用Raspberry Pi Imager,就像平时设置Raspberry Pi时一样。
To remount the root filesystem as read/write, run the following command
#To remount the root filesystem as read/write, run the following command
#
sudo mount -o remount,rw /
#检查fstab
/etc/fstab


proc            /proc           proc    defaults          0       0
PARTUUID=35786a18-01  /boot           vfat    defaults          0       2
PARTUUID=35786a18-02  /               ext4    defaults,noatime  0       1
# a swapfile is not a swap partition, no line here
#   use  dphys-swapfile swap[on|off]  for that
#查看sudo blkid
# sudo blkid
/dev/mmcblk0p1: LABEL="BOOT" UUID="8010-7113" TYPE="vfat" PARTUUID="17869b7d-01"
/dev/sda1: LABEL_FATBOOT="boot" LABEL="boot" UUID="F661-303B" TYPE="vfat" PARTUUID="17869b7d-01"
/dev/sda2: LABEL="rootfs" UUID="8d008fde-f12a-47f7-8519-197ea707d3d4" TYPE="ext4" PARTUUID="17869b7d-02"
/dev/mmcblk0: PTUUID="17869b7d" PTTYPE="dos"
Applying Quirks
#
#在里面更改
sudo nano /boot/cmdline.txt

#We are going to add the following entry into the very front of cmdline.txt:

#xxxx在lsusb中查,下面加在cmdline.txt最前面

usb-storage.quirks=XXXX:XXXX:u


#usb-storage.quirks=0781:5588:u console=serial0,115200 console=tty1 root=PARTUUID=35786a18-02 rootfstype=ext4 elevator=deadline fsck.repair=yes rootwait
#
#
sudo mkdir /mnt/mydisk
#
sudo mount /dev/sda2 /mnt/my
#
sudo mount /dev/sda1 /mnt/mydisk
#
sudo cp /boot/*.elf /mnt/mydisk
sudo cp /boot/*.dat /mnt/mydisk
https://www.raspberrypi.org/forums/viewtopic.php?t=250368
https://www.raspberrypi.org/documentation/hardware/raspberrypi/booteeprom.md
https://www.raspberrypi.org/documentation/hardware/raspberrypi/bcm2711_bootloader_config.md
https://www.raspberrypi.org/forums/viewtopic.php?t=184513
https://www.raspberrypi.org/forums/viewtopic.php?t=251733
https://jamesachambers.com/raspberry-pi-4-usb-boot-config-guide-for-ssd-flash-drives/
vim /etc/ssh/sshd_config
#Subsystem      sftp    /usr/libexec/openssh/sftp-server
#改为
Subsystem       sftp    internal-sftp
service sshd restart
DNS64是与NAT64搭配使用的,原理很简单,修改你的DNS到DNS64提供者的DNS,当你发出向解析到IPv4的域名的请求后,DNS会将IPv4地址按照一定格式嵌入IPv6地址中;这个返回IPv6地址会指向NAT64的服务器,NAT64网关会按照它包含的信息获取IPv4的数据并转发给你,这样一来你就能够直接访问IPv4的网站了。
提供DNS64的服务商很多,比如谷歌等,但是它们并不提供配套的NAT64,需要你自己在内网搭建一个NAT64网关。当然欧洲有一些公益组织提供免费的DNS64+NAT64服务,比如下面这两个。
# http://www.trex.fi/2011/dns64.html
nameserver 2001:67c:2b0::4
nameserver 2001:67c:2b0::6

# https://go6lab.si/current-ipv6-tests/nat64dns64-public-test/
nameserver 2001:67c:27e4:15::6411
nameserver 2001:67c:27e4::64

# https://nat64.level66.network
nameserver 2a09:11c0:f1:bbf0::70
一般修改/etc/resolv.conf的namesever值即可,不过部分系统想要永久修改需要编辑一些其他的参数,大家就自行查阅资料吧
DNS64的好处是配置十分方便,足以满足大部分的调试需求。当然弊端也十分明显,服务商会记录你三天的浏览记录以防止用于不法用途,且NAT64服务器到你的服务器速度未必非常理想。
选择一个IPv4/IPv6双栈的VPS,安装上代理程序,并在本地指向代理,那么就可以通过这个跳板访问IPv4的网站了。
如果你实在没有双栈的VPS,可以参考这一篇给自己有IPv4的VPS加个Tunnel
笔者在这里选的是V2ray(点击前往),服务端的安装不再赘述,为了性能考虑默认的TCP传输即可,服务端无需过多配置
客户端由于是纯IPv6安装,手动的就不细讲了,把安装脚本脚本下载的代码删掉,去GitHub下载对应的软件包放在/tmp/v2ray/v2ray.zip运行脚本即可
最简单的当然是临时改一下DNS64装一下不就得了
编辑/etc/v2ray/config.json,按照你的服务端修改一下配置信息重启v2ray即可(其他的加密方式你看着inbound改就是了)
{
  "log":{},
  "dns":{},
  "stats":{},
  "inbounds":[
    {
      "port":"1081",     //HTTP方式监听本地1081端口
      "protocol":"http",
      "settings":{},
      "tag":"in-0"
    }
  ],
  "outbounds":[
    {
      "protocol":"vmess",
      "settings":{
        "vnext":[
          {
            "address":"2001:2001::1",                      //服务端IP()
            "port":2333,                                   //服务端端口
            "users":[
              {
                "id":"1c07df9c-xxxx-xxxx-xxxx-xxxxxxxxxxxx", //验证身份的UUID
                "alterId":64
              }
            ]
          }
        ]
      },
      "tag":"out-0",
      "streamSettings":{
        "network":"tcp",
        "security":"none",
        "tcpSettings":{}
      }
    },
    {
      "tag":"direct",
      "protocol":"freedom",
      "settings":{}
    },
    {
      "tag":"blocked",
      "protocol":"blackhole",
      "settings":{}
    }
  ],
  "routing":{
    "domainStrategy":"IPOnDemand",
    "rules":[
      {
        "type":"field",
        "ip":[
          "geoip:private"
        ],
        "outboundTag":"direct"
      }
    ]
  },
  "policy":{},
  "reverse":{},
  "transport":{}
}
编辑/etc/profile.d/v2.sh,将以下变量指向http代理Shell
export proxy="127.0.0.1:1081"
export http_proxy=$proxy
export https_proxy=$proxy
export no_proxy="archive.ubuntu.com, 127.0.0.1, ::1"
如果不需要代理了可以直接rm -rf /etc/profile.d/v2.sh,重启即可。no_proxy是指定不通过代理的,因为镜像站支持IPv6没必要走代理,我就加进去了,有需求自己加就行了。
当然这种方式也是只代理了HTTP和HTTPS请求
2a04:4e42::133 assets-cdn.github.com
2a04:4e42::133 camo.githubusercontent.com
2a04:4e42::133 cloud.githubusercontent.com
2a04:4e42::133 gist.githubusercontent.com
2a04:4e42::133 avatars.githubusercontent.com
2a04:4e42::133 avatars0.githubusercontent.com
2a04:4e42::133 avatars1.githubusercontent.com
2a04:4e42::133 avatars2.githubusercontent.com
2a04:4e42::133 avatars3.githubusercontent.com
2a04:4e42::133 marketplace-images.githubusercontent.com
2a04:4e42::133 user-images.githubusercontent.com
2a04:4e42::133 raw.githubusercontent.com

2606:4700::6810:1723 registry.npmjs.org